
54. Using TensorFlow High-Level APIs#
54.1. Introduction#
As a deep learning framework, TensorFlow is of course designed to help us build neural networks more conveniently. Therefore, in this experiment, we will learn how to use TensorFlow to build neural networks and master the important functions and methods for building neural networks in TensorFlow.
54.2. Key Points#
Keras Sequential Model
Keras Functional Model
Keras Model Storage and Inference
Estimator High-Level API
54.3. Introduction to
the
tf.keras
Module#
Originally an independent high-level neural network API
written in Python, Keras can run with TensorFlow, CNTK, or
Theano as the backend. Currently, TensorFlow has
incorporated Keras and formed the
tf.keras
module
🔗. According to the official introduction,
tf.keras
is slightly different from the separately installed Keras.
However, considering future development trends, this
experiment focuses on learning
tf.keras.

By referring to the official documentation, you can find
that there are more than 10 sub-modules under
tf.keras
🔗, and a large number of classes and functions are
integrated under these sub-modules. Since Keras was
previously released independently, in fact, when we only use
tf.keras, we can almost meet all the requirements for building deep
neural networks.
Next, we will give a quick introduction to getting started with Keras. The core data structure of Keras is the Model, a way to organize network layers. There are two modes. The simplest and most commonly used model is the Sequential model, which is a stack of multiple network layers linearly stacked. For more complex structures, the Keras functional API can be used, which allows building arbitrary neural network graphs.
54.4. Keras Sequential Model#
Creating a Sequential model using Keras is very simple. Just
one line of code
tf.keras.models.Sequential()
🔗
is all it takes.
import tensorflow as tf
import warnings

warnings.filterwarnings("ignore")

model = tf.keras.models.Sequential()  # 定义顺序模型
model
<keras.src.engine.sequential.Sequential at 0x1412695d0>
Of course, the above line of code is certainly not yet a neural network model. Only by adding neural network layers with different structures to it can it truly become the neural network model we need. Here we choose the simple fully-connected neural network that we have built in the previous experiment.
Neural network layers in Keras are all under
tf.keras.layers
🔗. Here it contains the functional layers required for
respective classic neural networks. For example, the
fully-connected layer
tf.keras.layers.Dense
that we need here.
Dense(units, activation=None, use_bias=True, kernel_initializer='glorot_uniform', bias_initializer='zeros', kernel_regularizer=None, bias_regularizer=None, activity_regularizer=None, kernel_constraint=None, bias_constraint=None)
-
units: A positive integer, dimensionality of the output space.
-
activation: Activation function. If not specified, no activation is applied (ie, “linear” activation:
a(x)
                          =
                          x
). -
use_bias: A boolean, whether the layer uses a bias vector.
-
kernel_initializer: Initializer for the
kernelweights matrix. -
bias_initializer: Initializer for the bias vector.
-
kernel_regularizer: Regularizer function applied to the
kernelweights matrix. -
bias_regularizer: Regularizer function applied to the bias.
-
activity_regularizer: Regularizer function applied to the output of the layer.
-
kernel_constraint: Constraint function applied to the
kernelweights matrix. -
bias_constraint: Constraint function applied to the bias vector.
The Dense layer implements the operation:
output
                      =
                      activation(dot(input,
                      kernel)
                      +
                      bias)
where
activation
is the element-wise activation function,
kernel
is the weights matrix created by the layer, and
bias
is the bias vector created by the layer (only useful when
use_bias
is
True). As you can see from the arguments, this is a high-level
API that encapsulates a lot of functionality.
Next, we add two fully-connected layers to the sequential
model
model
defined above.
# 添加全连接层
model.add(tf.keras.layers.Dense(units=30, activation=tf.nn.relu))  # 输出 30,relu 激活
model.add(tf.keras.layers.Dense(units=10, activation=tf.nn.softmax))  # 输出 10,softmax 激活
You can find that at the beginning, when we define the
sequential model, it’s like “laying the foundation”, and we
can “build the building” just by using
add. In the above code, the activation function
tf.nn.relu
can also be replaced with the name
'relu', that is, it can be written as
tf.keras.layers.Dense(units=30,
                      activation='relu')
. For specific references, please refer to
🔗.
After adding the neural network layers, you can use
model.compile
🔗
to compile the sequential model. At this time, you need to
specify the optimizer, loss function, and evaluation method
through parameters.
# adam 优化器 + 交叉熵损失 + 准确度评估
model.compile(
    optimizer="adam", loss="sparse_categorical_crossentropy", metrics=["accuracy"]
)
Among them, the parameters can use the names as shown above or TensorFlow instances. If using instance optimizers and loss functions, you need to select from the list of all optimizers supported by TensorFlow and the list of all loss functions. If using names, you need to select from the list of names supported by Keras.
It should be noted that the loss function here cannot be
randomly selected. You need to decide according to the
output shape of the network and the shape of the true
values. An error will be reported if they do not match.
Since the experimental example network finally passes
through the
tf.nn.softmax
activation, for a single sample input, a single integer type
output with the highest probability will be obtained in the
end. At this time, the
sparse_categorical_crossentropy
cross-entropy loss function with an integer output type is
selected. As the experiment progresses, you will gain more
experience as you see more.
Next, we define the data and also choose the DIGITS dataset.
from sklearn.model_selection import train_test_split
from sklearn.datasets import load_digits
import numpy as np

# 准备 DIGITS 数据
digits = load_digits()
X_train, X_test, y_train, y_test = train_test_split(
    digits.data, digits.target, test_size=0.2, random_state=1
)

X_train.shape, X_test.shape, y_train.shape, y_test.shape
((1437, 64), (360, 64), (1437,), (360,))
There is no need to perform one-hot encoding on the target values as in the previous experiments because the final output of the network defined above is itself the integer of the sample category.
After defining the data, you can start training the model
using
model.fit
🔗. This process is as intuitive as training a model using
scikit-learn. We need to specify the mini-batch
batch_size
and the number of epochs
epochs
parameter for the entire data iteration.
# 模型训练
model.fit(X_train, y_train, batch_size=64, epochs=5)
Epoch 1/5
23/23 [==============================] - 0s 610us/step - loss: 6.4905 - accuracy: 0.1176
Epoch 2/5
23/23 [==============================] - 0s 544us/step - loss: 3.1685 - accuracy: 0.2436
Epoch 3/5
23/23 [==============================] - 0s 641us/step - loss: 1.8032 - accuracy: 0.4774
Epoch 4/5
23/23 [==============================] - 0s 680us/step - loss: 1.2326 - accuracy: 0.6451
Epoch 5/5
23/23 [==============================] - 0s 583us/step - loss: 0.9109 - accuracy: 0.7363
<keras.src.callbacks.History at 0x2a4423760>
You can see the loss and classification accuracy of the
model on the training data after each Epoch. Use
model.evaluate
to evaluate the loss and classification accuracy of the
trained model on the test set.
# 模型评估
model.evaluate(X_test, y_test)
12/12 [==============================] - 0s 520us/step - loss: 0.8579 - accuracy: 0.7472
[0.8579378724098206, 0.7472222447395325]
In actual use, we generally directly pass the test data into
the training process through the
validation_data
parameter. Then, after each Epoch, the classification
evaluation results on both the training set and the test set
will be output simultaneously.
# 使用参数传入测试数据
model.fit(X_train, y_train, batch_size=64, epochs=5, validation_data=(X_test, y_test))
Epoch 1/5
23/23 [==============================] - 0s 2ms/step - loss: 0.7071 - accuracy: 0.7850 - val_loss: 0.6989 - val_accuracy: 0.8139
Epoch 2/5
23/23 [==============================] - 0s 1ms/step - loss: 0.5634 - accuracy: 0.8413 - val_loss: 0.5742 - val_accuracy: 0.8417
Epoch 3/5
23/23 [==============================] - 0s 1ms/step - loss: 0.4699 - accuracy: 0.8692 - val_loss: 0.4948 - val_accuracy: 0.8611
Epoch 4/5
23/23 [==============================] - 0s 1ms/step - loss: 0.3998 - accuracy: 0.8852 - val_loss: 0.4493 - val_accuracy: 0.8722
Epoch 5/5
23/23 [==============================] - 0s 999us/step - loss: 0.3482 - accuracy: 0.8991 - val_loss: 0.4052 - val_accuracy: 0.8972
<keras.src.callbacks.History at 0x2a4d7f3a0>
As can be seen, different from the relatively complex model definition process in the previous experiments, using the sequential model provided by Keras only requires about a few lines of code to complete. In addition, you don’t need to initialize weights, write the forward computational graph, design the Mini Batch mechanism, customize the evaluation method and process, etc. Basically, the complex processes in building a neural network are omitted, leaving only an intuitive construction method. This is why Keras is deeply loved and also the reason why TensorFlow incorporates Keras.
Although we only used a few methods previously, you will find that each method involves a very large number of parameters. These parameters can help developers further achieve a highly customized process on the high-level API. For beginners, don’t try to understand everything at once. As you gradually deepen your understanding of deep learning later, you will become familiar with them all. In reality, even experienced developers can’t remember every API and parameter. Most of the time, they need to consult the official documentation when using them. To put it another way, due to the very fast pace of change and update of the TensorFlow API, even if you remember it this time, you may still need to consult the official documentation next time.
54.5. Keras Functional Model#
In addition to the sequential model, Keras also provides a functional API. The biggest difference from the sequential model is that the functional model can handle multiple inputs and outputs. And all models are callable. Just like layers, by using the interface of the functional model, we can easily reuse a trained model.
Next, let’s rewrite the above model structure using the functional API.
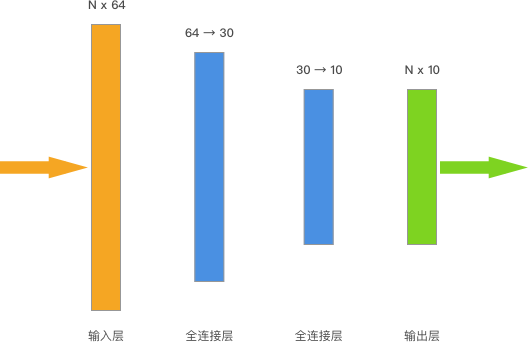
inputs = tf.keras.Input(shape=(64,))  # 输入层
x = tf.keras.layers.Dense(units=30, activation="relu")(inputs)  # 中间层
outputs = tf.keras.layers.Dense(units=10, activation="softmax")(x)  # 输出层

# 函数式 API 需要指定输入和输出
model = tf.keras.Model(inputs=inputs, outputs=outputs)
model
<keras.src.engine.functional.Functional at 0x2a58483d0>
The model compilation and training are basically the same as those of the sequential model.
model.compile(
    optimizer="adam", loss="sparse_categorical_crossentropy", metrics=["accuracy"]
)

model.fit(X_train, y_train, batch_size=64, epochs=20, validation_data=(X_test, y_test))
Epoch 1/20
23/23 [==============================] - 0s 3ms/step - loss: 6.9277 - accuracy: 0.2143 - val_loss: 3.8674 - val_accuracy: 0.3361
Epoch 2/20
23/23 [==============================] - 0s 1ms/step - loss: 2.8077 - accuracy: 0.3925 - val_loss: 1.8169 - val_accuracy: 0.5278
Epoch 3/20
23/23 [==============================] - 0s 1ms/step - loss: 1.4311 - accuracy: 0.6026 - val_loss: 1.0242 - val_accuracy: 0.7028
Epoch 4/20
23/23 [==============================] - 0s 1ms/step - loss: 0.9445 - accuracy: 0.7307 - val_loss: 0.7485 - val_accuracy: 0.7583
Epoch 5/20
23/23 [==============================] - 0s 1ms/step - loss: 0.7112 - accuracy: 0.7996 - val_loss: 0.5753 - val_accuracy: 0.8306
Epoch 6/20
23/23 [==============================] - 0s 1ms/step - loss: 0.5763 - accuracy: 0.8365 - val_loss: 0.4773 - val_accuracy: 0.8583
Epoch 7/20
23/23 [==============================] - 0s 1ms/step - loss: 0.4701 - accuracy: 0.8622 - val_loss: 0.4051 - val_accuracy: 0.8750
Epoch 8/20
23/23 [==============================] - 0s 1ms/step - loss: 0.4065 - accuracy: 0.8789 - val_loss: 0.3500 - val_accuracy: 0.8833
Epoch 9/20
23/23 [==============================] - 0s 1ms/step - loss: 0.3492 - accuracy: 0.8956 - val_loss: 0.3056 - val_accuracy: 0.9083
Epoch 10/20
23/23 [==============================] - 0s 1ms/step - loss: 0.3058 - accuracy: 0.9054 - val_loss: 0.2715 - val_accuracy: 0.9222
Epoch 11/20
23/23 [==============================] - 0s 987us/step - loss: 0.2672 - accuracy: 0.9207 - val_loss: 0.2475 - val_accuracy: 0.9167
Epoch 12/20
23/23 [==============================] - 0s 996us/step - loss: 0.2427 - accuracy: 0.9276 - val_loss: 0.2355 - val_accuracy: 0.9194
Epoch 13/20
23/23 [==============================] - 0s 1ms/step - loss: 0.2203 - accuracy: 0.9332 - val_loss: 0.2141 - val_accuracy: 0.9194
Epoch 14/20
23/23 [==============================] - 0s 986us/step - loss: 0.2044 - accuracy: 0.9367 - val_loss: 0.2031 - val_accuracy: 0.9250
Epoch 15/20
23/23 [==============================] - 0s 1ms/step - loss: 0.1820 - accuracy: 0.9478 - val_loss: 0.1872 - val_accuracy: 0.9222
Epoch 16/20
23/23 [==============================] - 0s 938us/step - loss: 0.1683 - accuracy: 0.9450 - val_loss: 0.1780 - val_accuracy: 0.9250
Epoch 17/20
23/23 [==============================] - 0s 1ms/step - loss: 0.1557 - accuracy: 0.9555 - val_loss: 0.1729 - val_accuracy: 0.9306
Epoch 18/20
23/23 [==============================] - 0s 1ms/step - loss: 0.1441 - accuracy: 0.9569 - val_loss: 0.1639 - val_accuracy: 0.9417
Epoch 19/20
23/23 [==============================] - 0s 1ms/step - loss: 0.1340 - accuracy: 0.9610 - val_loss: 0.1577 - val_accuracy: 0.9389
Epoch 20/20
23/23 [==============================] - 0s 1ms/step - loss: 0.1269 - accuracy: 0.9659 - val_loss: 0.1491 - val_accuracy: 0.9444
<keras.src.callbacks.History at 0x2a584b550>
Through the above examples, I believe you have already seen the differences between the sequential model and the functional model. The functional model seems to better conform to the modeling process, with clear inputs and outputs and greater flexibility. In fact, for both, it mainly depends on personal usage habits. Beginners can freely choose according to their own preferences.
54.6. Keras Model Storage and Inference#
The models trained using Keras can be very conveniently saved. There are mainly two purposes for saving the models:
-
For larger training tasks, saving the model can facilitate subsequent resumption and reuse.
-
The saved model can facilitate model deployment.
TensorFlow models generally contain three types of elements, namely: model weight values, model configurations, and even optimizer configurations.
If you only need to save the model weight values, you can
use
tf.keras.Model.save_weights
🔗
and specify the storage path.
model.save_weights("./weights/model") # 保存检查点名称为 model,路径为 ./weights
!ls './weights/' # 直接运行查看目录下文件
checkpoint model.data-00000-of-00001 model.index
model.load_weights("./weights/model") # 恢复检查点
<tensorflow.python.checkpoint.checkpoint.CheckpointLoadStatus at 0x10673b6d0>
By default, this method saves the model’s weights in the TensorFlow checkpoint file format 🔗. Checkpoint files are a TensorFlow-specific method for saving model weights. By default, it writes a checkpoint every 10 minutes (600 seconds). If the training time is short, only one checkpoint is saved. By default, only 5 checkpoints are saved, which are the version states at different time points during the model training process.
We generally set checkpoint saving during large-scale task training. The advantage of doing this is that in case the training is terminated due to unexpected circumstances, TensorFlow can load the checkpoint state, avoiding the need to start training from scratch.
If we need to perform model inference, we generally use
model.save
to save the entire model, which includes model weight
values, model configurations, and even optimizer
configurations. For example, the following saves the model
in the Keras HDF5 format, which is the default format for
Keras’ multi-backend implementation.
model.save("model.h5") # 保存完整模型
Next, you can use
tf.keras.models.load_model
to reload the model.
model_ = tf.keras.models.load_model("model.h5") # 调用模型
model.summary()
can be used to view the Keras model structure, including
detailed data such as neural network layers and parameters.
model_.summary()
Model: "model"
_________________________________________________________________
 Layer (type)                Output Shape              Param #
=================================================================
 input_1 (InputLayer)        [(None, 64)]              0

 dense_2 (Dense)             (None, 30)                1950

 dense_3 (Dense)             (None, 10)                310

=================================================================
Total params: 2260 (8.83 KB)
Trainable params: 2260 (8.83 KB)
Non-trainable params: 0 (0.00 Byte)
_________________________________________________________________
Then, the
predict
method can be used to complete model inference.
preds = model_.predict(X_test[:3])  # 预测前 3 个测试样本
preds
1/1 [==============================] - 0s 149ms/step
array([[4.73537875e-06, 9.17093933e-01, 4.64934768e-04, 2.65565213e-05,
        2.28360551e-03, 3.85231651e-05, 4.47081402e-03, 9.71576490e-04,
        7.46408477e-02, 4.48814944e-06],
       [1.64942004e-10, 2.32878183e-09, 5.78561583e-07, 2.30714594e-08,
        8.31453795e-11, 9.99986291e-01, 6.51977983e-09, 1.30634835e-05,
        3.22499787e-08, 5.17414334e-09],
       [9.99606788e-01, 6.16279285e-05, 2.53702492e-05, 1.37913734e-08,
        1.90027888e-04, 5.15496940e-05, 5.33620005e-05, 8.60737828e-08,
        1.32346440e-06, 9.78428307e-06]], dtype=float32)
The prediction result is the output value after the neural network is activated by Softmax. Therefore, we use NumPy to find the maximum probability of each sample’s output and its corresponding index, and this index is the final prediction target. Similarly, the true labels of the test data can be output for comparison.
np.argmax(preds, axis=1), np.max(preds, axis=1) # 找出每个样本预测概率最大值索引及其概率
(array([1, 5, 0]), array([0.91709393, 0.9999863 , 0.9996068 ], dtype=float32))
y_test[:3] # 直接运行查看前 3 个测试样本真实标签
array([1, 5, 0])
Generally, the model’s predictions are correct. If there are errors, you can check the evaluation of the model above and appropriately increase the number of epochs to improve the model’s accuracy.
54.7. Estimator High-Level API#
We have already learned about building neural networks using
tf.keras
above. Of course, as we delve deeper into subsequent
learning, we will gradually introduce more neural network
layers with various uses and more diverse usage methods. In
this section, we will introduce another very important
component of TensorFlow, Estimator.
Estimator is a high-level API in TensorFlow that can
encapsulate operations such as model training, prediction,
evaluation, and export into an Estimator. TensorFlow also
provides a large number of pre-created Estimators
🔗, such as linear regression, boosted tree classifiers, deep
neural network classifiers, etc. Next, we will use the
pre-created
tf.estimator.DNNClassifier
🔗, a fully connected deep neural network provided by
TensorFlow, to complete the learning of the sample data.
To write a TensorFlow program using a pre-created Estimator, the following steps generally need to be performed: 🔗
Create one or more input functions.
Define the feature columns of the model.
-
Instantiate an Estimator, specifying the feature columns and various hyperparameters.
-
Call one or more methods on the Estimator object, passing the appropriate input function as the source of data.
Next, we will complete it in 4 steps. First of all, the data input to the Estimator for training, evaluation, and prediction must be completed by creating input functions.
An input function is a function that returns a
tf.data.Dataset
🔗
object, which outputs the following two-element tuple:
-
features- A Python dictionary where:Each key is the name of a feature.
-
Each value is an array containing all the values of this feature.
-
label- An array containing the label values for each sample.
So next, we will convert the original NumPy arrays into a DataFrame provided by Pandas, which can conveniently convert the data into the Python dictionary type required by the input function.
import pandas as pd

# NumPy 数组转换为 DataFrame,并将特征列名处理成字符串类型
X_train_ = pd.DataFrame(X_train, columns=[str(i) for i in range(64)])
y_train_ = pd.DataFrame(y_train, columns=["class"])  # 标签列名
X_test_ = pd.DataFrame(X_test, columns=[str(i) for i in range(64)])
y_test_ = pd.DataFrame(y_test, columns=["class"])
At this point, you can directly process the DataFrame into a dictionary type, with the column names as keys and the data as values.
dict(X_train_).keys() # 运行使用 dict 将数据处理成输入函数要求的字典类型
dict_keys(['0', '1', '2', '3', '4', '5', '6', '7', '8', '9', '10', '11', '12', '13', '14', '15', '16', '17', '18', '19', '20', '21', '22', '23', '24', '25', '26', '27', '28', '29', '30', '31', '32', '33', '34', '35', '36', '37', '38', '39', '40', '41', '42', '43', '44', '45', '46', '47', '48', '49', '50', '51', '52', '53', '54', '55', '56', '57', '58', '59', '60', '61', '62', '63'])
Let’s directly start defining the data input function
input_fn. The
tf.data.Dataset
🔗
object is a data pipeline strongly recommended by
TensorFlow. When the data is a
Dataset, you can use a series of methods provided by TensorFlow to
transform the data, such as shuffling, repeating, and
mini-batch input.
def input_fn(features, labels, batch_size):
    """数据输入函数"""
    # 将数据转换为 Dataset 对象
    dataset = tf.data.Dataset.from_tensor_slices((dict(features), labels))
    # 将数据重复及处理成小批量
    dataset = dataset.repeat().batch(batch_size)
    return dataset
In the above code, the
tf.data.Dataset.from_tensor_slices
function creates a
tf.data.Dataset
representing slices of an array. The system slices the array
along the first dimension. Then the
dataset
performs the
repeat
operation on the sequence. The purpose of this is to ensure
that it can be iterated more times later. Otherwise, the
training will terminate after one pass through the data.
repeat()
means infinite expansion, that is, until the number of
iterations we set.
repeat(5)
means repeating the sequence 5 times, and the sample data
becomes 5 times the original. Then, we use
batch
to iterate by taking a mini-batch of
batch_size
from the data each time.
Thus, the creation of the data input function is completed. Next, complete the second step: define the feature columns of the model.
Feature columns are the medium between the raw data and the Estimator. Defining feature columns means telling the Estimator which are the features and what characteristics the data of each feature has. Defining feature columns is not as simple as specifying a few strings. We need to use the methods provided by TensorFlow to create feature columns that the Estimator can recognize.
Next, we take out the column names of the feature DataFrame
and use
tf.feature_column.numeric_column
🔗
to convert them into feature columns. This method tells the
Estimator that the features are of the Numeric type. For
more types of feature columns, you can refer to the official
documentation
🔗.
feature_columns = []
for key in X_train_.keys():  # 取出 DataFrame 列名
    feature_columns.append(tf.feature_column.numeric_column(key=key))  # 创建数值特征列

feature_columns[:3]  # 查看前 3 个特征列
WARNING:tensorflow:From /var/folders/tc/9kxpg1x95sl6cm2lc2jwpgt80000gn/T/ipykernel_76374/1932890431.py:3: numeric_column (from tensorflow.python.feature_column.feature_column_v2) is deprecated and will be removed in a future version.
Instructions for updating:
Use Keras preprocessing layers instead, either directly or via the `tf.keras.utils.FeatureSpace` utility. Each of `tf.feature_column.*` has a functional equivalent in `tf.keras.layers` for feature preprocessing when training a Keras model.
[NumericColumn(key='0', shape=(1,), default_value=None, dtype=tf.float32, normalizer_fn=None),
 NumericColumn(key='1', shape=(1,), default_value=None, dtype=tf.float32, normalizer_fn=None),
 NumericColumn(key='2', shape=(1,), default_value=None, dtype=tf.float32, normalizer_fn=None)]
After completing step 2, step 3 is to instantiate the
Estimator, specifying the feature columns and various
hyperparameters. Here, we use
tf.estimator.DNNClassifier, which requires passing in the feature columns and
defining the number of neurons in the hidden layer, i.e.,
the number of target value labels.
classifier = tf.estimator.DNNClassifier(
    # 特征列
    feature_columns=feature_columns,
    # 两个隐含层分别为 30 和 10 个神经元
    hidden_units=[30, 10],
    # 模型最终标签类别为 10
    n_classes=10,
)
WARNING:tensorflow:From /var/folders/tc/9kxpg1x95sl6cm2lc2jwpgt80000gn/T/ipykernel_76374/2381246142.py:1: DNNClassifierV2.__init__ (from tensorflow_estimator.python.estimator.canned.dnn) is deprecated and will be removed in a future version.
Instructions for updating:
Use tf.keras instead.
WARNING:tensorflow:From /Users/huhuhang/miniconda3/lib/python3.10/site-packages/tensorflow_estimator/python/estimator/head/head_utils.py:59: MultiClassHead.__init__ (from tensorflow_estimator.python.estimator.head.multi_class_head) is deprecated and will be removed in a future version.
Instructions for updating:
Use tf.keras instead.
WARNING:tensorflow:From /Users/huhuhang/miniconda3/lib/python3.10/site-packages/tensorflow_estimator/python/estimator/canned/dnn.py:759: Estimator.__init__ (from tensorflow_estimator.python.estimator.estimator) is deprecated and will be removed in a future version.
Instructions for updating:
Use tf.keras instead.
WARNING:tensorflow:From /Users/huhuhang/miniconda3/lib/python3.10/site-packages/tensorflow_estimator/python/estimator/estimator.py:1844: RunConfig.__init__ (from tensorflow_estimator.python.estimator.run_config) is deprecated and will be removed in a future version.
Instructions for updating:
Use tf.keras instead.
INFO:tensorflow:Using default config.
WARNING:tensorflow:Using temporary folder as model directory: /var/folders/tc/9kxpg1x95sl6cm2lc2jwpgt80000gn/T/tmpl7aio9hp
INFO:tensorflow:Using config: {'_model_dir': '/var/folders/tc/9kxpg1x95sl6cm2lc2jwpgt80000gn/T/tmpl7aio9hp', '_tf_random_seed': None, '_save_summary_steps': 100, '_save_checkpoints_steps': None, '_save_checkpoints_secs': 600, '_session_config': allow_soft_placement: true
graph_options {
  rewrite_options {
    meta_optimizer_iterations: ONE
  }
}
, '_keep_checkpoint_max': 5, '_keep_checkpoint_every_n_hours': 10000, '_log_step_count_steps': 100, '_train_distribute': None, '_device_fn': None, '_protocol': None, '_eval_distribute': None, '_experimental_distribute': None, '_experimental_max_worker_delay_secs': None, '_session_creation_timeout_secs': 7200, '_checkpoint_save_graph_def': True, '_service': None, '_cluster_spec': ClusterSpec({}), '_task_type': 'worker', '_task_id': 0, '_global_id_in_cluster': 0, '_master': '', '_evaluation_master': '', '_is_chief': True, '_num_ps_replicas': 0, '_num_worker_replicas': 1}
Immediately afterwards, one or more methods can be called on
the Estimator object, passing the appropriate input function
as the source of data. It is worth noting that the
input_fn
call is encapsulated in a
lambda
to obtain the parameters.
The
steps
parameter tells the method to stop training after multiple
steps. The
steps
is different from the previous Epoch. At this time, it is
equivalent to taking out
steps
batches of data with the
batch_size
for training. And the entire training process is equivalent
to
steps
                      *
                      batch_size
                      / total
                      number
                      of
                      data
Epochs.
🔗
Therefore, the Epoch converted by
steps
may not be an integer, but this will not affect the training
process.
classifier.train(
    input_fn=lambda: input_fn(X_train_, y_train_, batch_size=64), steps=2000
)
WARNING:tensorflow:From /Users/huhuhang/miniconda3/lib/python3.10/site-packages/tensorflow_estimator/python/estimator/estimator.py:385: StopAtStepHook.__init__ (from tensorflow.python.training.basic_session_run_hooks) is deprecated and will be removed in a future version.
Instructions for updating:
Use tf.keras instead.
INFO:tensorflow:Calling model_fn.
WARNING:tensorflow:From /Users/huhuhang/miniconda3/lib/python3.10/site-packages/keras/src/optimizers/legacy/adagrad.py:93: calling Constant.__init__ (from tensorflow.python.ops.init_ops) with dtype is deprecated and will be removed in a future version.
Instructions for updating:
Call initializer instance with the dtype argument instead of passing it to the constructor
WARNING:tensorflow:From /Users/huhuhang/miniconda3/lib/python3.10/site-packages/tensorflow_estimator/python/estimator/model_fn.py:250: EstimatorSpec.__new__ (from tensorflow_estimator.python.estimator.model_fn) is deprecated and will be removed in a future version.
Instructions for updating:
Use tf.keras instead.
INFO:tensorflow:Done calling model_fn.
WARNING:tensorflow:From /Users/huhuhang/miniconda3/lib/python3.10/site-packages/tensorflow_estimator/python/estimator/estimator.py:1416: NanTensorHook.__init__ (from tensorflow.python.training.basic_session_run_hooks) is deprecated and will be removed in a future version.
Instructions for updating:
Use tf.keras instead.
WARNING:tensorflow:From /Users/huhuhang/miniconda3/lib/python3.10/site-packages/tensorflow_estimator/python/estimator/estimator.py:1419: LoggingTensorHook.__init__ (from tensorflow.python.training.basic_session_run_hooks) is deprecated and will be removed in a future version.
Instructions for updating:
Use tf.keras instead.
WARNING:tensorflow:From /Users/huhuhang/miniconda3/lib/python3.10/site-packages/tensorflow/python/training/basic_session_run_hooks.py:232: SecondOrStepTimer.__init__ (from tensorflow.python.training.basic_session_run_hooks) is deprecated and will be removed in a future version.
Instructions for updating:
Use tf.keras instead.
WARNING:tensorflow:From /Users/huhuhang/miniconda3/lib/python3.10/site-packages/tensorflow_estimator/python/estimator/estimator.py:1456: CheckpointSaverHook.__init__ (from tensorflow.python.training.basic_session_run_hooks) is deprecated and will be removed in a future version.
Instructions for updating:
Use tf.keras instead.
INFO:tensorflow:Create CheckpointSaverHook.
WARNING:tensorflow:From /Users/huhuhang/miniconda3/lib/python3.10/site-packages/tensorflow/python/training/monitored_session.py:579: StepCounterHook.__init__ (from tensorflow.python.training.basic_session_run_hooks) is deprecated and will be removed in a future version.
Instructions for updating:
Use tf.keras instead.
WARNING:tensorflow:From /Users/huhuhang/miniconda3/lib/python3.10/site-packages/tensorflow/python/training/monitored_session.py:586: SummarySaverHook.__init__ (from tensorflow.python.training.basic_session_run_hooks) is deprecated and will be removed in a future version.
Instructions for updating:
Use tf.keras instead.
INFO:tensorflow:Graph was finalized.
INFO:tensorflow:Running local_init_op.
INFO:tensorflow:Done running local_init_op.
INFO:tensorflow:Calling checkpoint listeners before saving checkpoint 0...
INFO:tensorflow:Saving checkpoints for 0 into /var/folders/tc/9kxpg1x95sl6cm2lc2jwpgt80000gn/T/tmpl7aio9hp/model.ckpt.
INFO:tensorflow:Calling checkpoint listeners after saving checkpoint 0...
WARNING:tensorflow:From /Users/huhuhang/miniconda3/lib/python3.10/site-packages/tensorflow/python/training/monitored_session.py:1455: SessionRunArgs.__new__ (from tensorflow.python.training.session_run_hook) is deprecated and will be removed in a future version.
Instructions for updating:
Use tf.keras instead.
WARNING:tensorflow:From /Users/huhuhang/miniconda3/lib/python3.10/site-packages/tensorflow/python/training/monitored_session.py:1454: SessionRunContext.__init__ (from tensorflow.python.training.session_run_hook) is deprecated and will be removed in a future version.
Instructions for updating:
Use tf.keras instead.
WARNING:tensorflow:From /Users/huhuhang/miniconda3/lib/python3.10/site-packages/tensorflow/python/training/monitored_session.py:1474: SessionRunValues.__new__ (from tensorflow.python.training.session_run_hook) is deprecated and will be removed in a future version.
Instructions for updating:
Use tf.keras instead.
INFO:tensorflow:loss = 19.24567, step = 0
INFO:tensorflow:global_step/sec: 653.907
INFO:tensorflow:loss = 5.731018, step = 100 (0.153 sec)
INFO:tensorflow:global_step/sec: 918.12
INFO:tensorflow:loss = 3.2766824, step = 200 (0.109 sec)
INFO:tensorflow:global_step/sec: 956.444
INFO:tensorflow:loss = 3.0654907, step = 300 (0.105 sec)
INFO:tensorflow:global_step/sec: 1001.7
INFO:tensorflow:loss = 2.758233, step = 400 (0.100 sec)
INFO:tensorflow:global_step/sec: 937.769
INFO:tensorflow:loss = 2.2654872, step = 500 (0.107 sec)
INFO:tensorflow:global_step/sec: 931.896
INFO:tensorflow:loss = 2.1456134, step = 600 (0.107 sec)
INFO:tensorflow:global_step/sec: 999.022
INFO:tensorflow:loss = 2.324047, step = 700 (0.100 sec)
INFO:tensorflow:global_step/sec: 979.788
INFO:tensorflow:loss = 2.1866508, step = 800 (0.102 sec)
INFO:tensorflow:global_step/sec: 1017.6
INFO:tensorflow:loss = 2.284287, step = 900 (0.098 sec)
INFO:tensorflow:global_step/sec: 955.348
INFO:tensorflow:loss = 2.2110753, step = 1000 (0.105 sec)
INFO:tensorflow:global_step/sec: 1002.31
INFO:tensorflow:loss = 2.3068185, step = 1100 (0.100 sec)
INFO:tensorflow:global_step/sec: 1002.2
INFO:tensorflow:loss = 2.0306604, step = 1200 (0.100 sec)
INFO:tensorflow:global_step/sec: 1007.3
INFO:tensorflow:loss = 1.9963558, step = 1300 (0.099 sec)
INFO:tensorflow:global_step/sec: 1009.2
INFO:tensorflow:loss = 2.1134849, step = 1400 (0.099 sec)
INFO:tensorflow:global_step/sec: 1019.92
INFO:tensorflow:loss = 2.19884, step = 1500 (0.098 sec)
INFO:tensorflow:global_step/sec: 997.924
INFO:tensorflow:loss = 1.9835203, step = 1600 (0.100 sec)
INFO:tensorflow:global_step/sec: 1013.38
INFO:tensorflow:loss = 1.9176695, step = 1700 (0.099 sec)
INFO:tensorflow:global_step/sec: 1022.44
INFO:tensorflow:loss = 2.1141558, step = 1800 (0.098 sec)
INFO:tensorflow:global_step/sec: 997.049
INFO:tensorflow:loss = 2.0802722, step = 1900 (0.100 sec)
INFO:tensorflow:Calling checkpoint listeners before saving checkpoint 2000...
INFO:tensorflow:Saving checkpoints for 2000 into /var/folders/tc/9kxpg1x95sl6cm2lc2jwpgt80000gn/T/tmpl7aio9hp/model.ckpt.
INFO:tensorflow:Calling checkpoint listeners after saving checkpoint 2000...
INFO:tensorflow:Loss for final step: 2.214003.
<tensorflow_estimator.python.estimator.canned.dnn.DNNClassifierV2 at 0x2a6228730>
You can see the process of the above training execution,
where the weights will be automatically saved as a
checkpoint
.ckpt
file. At the same time, in the subsequent training process,
the checkpoint will only be overwritten when the
loss
is better. The reason for this is that the subsequent model
inference needs to reload the checkpoint weights, which can
ensure that the performance state of the stored checkpoint
is optimal.
Next, we use the test data to perform inference evaluation
on the model. At this time, we need to redefine the data
input function
evaluate_input_fn
because the previously defined input function
input_fn
performed the
repeat()
operation, and if we continue to use it, it will cause the
inference to continue indefinitely.
def evaluate_input_fn(features, labels, batch_size):
    """评估数据输入函数"""
    # 将数据转换为 Dataset 对象
    dataset = tf.data.Dataset.from_tensor_slices((dict(features), labels))
    # 将仅处理成小批量
    dataset = dataset.batch(batch_size)
    return dataset
Finally, use
evaluate
to evaluate the model. The process of passing in the data is
similar to that during training. The Estimator will
automatically reload the checkpoint saved during training
and perform inference and evaluation on the test data.
# 评估模型
eval_result = classifier.evaluate(
    input_fn=lambda: evaluate_input_fn(X_test_, y_test_, batch_size=64)
)

print("最终评估准确度:{:.3f}".format(eval_result["accuracy"]))
INFO:tensorflow:Calling model_fn.
INFO:tensorflow:Done calling model_fn.
INFO:tensorflow:Starting evaluation at 2023-11-11T17:30:04
WARNING:tensorflow:From /Users/huhuhang/miniconda3/lib/python3.10/site-packages/tensorflow/python/training/evaluation.py:260: FinalOpsHook.__init__ (from tensorflow.python.training.basic_session_run_hooks) is deprecated and will be removed in a future version.
Instructions for updating:
Use tf.keras instead.
INFO:tensorflow:Graph was finalized.
INFO:tensorflow:Restoring parameters from /var/folders/tc/9kxpg1x95sl6cm2lc2jwpgt80000gn/T/tmpl7aio9hp/model.ckpt-2000
INFO:tensorflow:Running local_init_op.
INFO:tensorflow:Done running local_init_op.
INFO:tensorflow:Inference Time : 0.13310s
INFO:tensorflow:Finished evaluation at 2023-11-11-17:30:04
INFO:tensorflow:Saving dict for global step 2000: accuracy = 0.24444444, average_loss = 2.0582526, global_step = 2000, loss = 2.07397
INFO:tensorflow:Saving 'checkpoint_path' summary for global step 2000: /var/folders/tc/9kxpg1x95sl6cm2lc2jwpgt80000gn/T/tmpl7aio9hp/model.ckpt-2000
最终评估准确度:0.244
Finally, we can obtain the test results. In addition to a large number of pre-created Estimators, you can also customize Estimators according to your own needs. You can directly read the relevant content in the corresponding chapter of the official documentation. For Estimators, the official recommended workflow by TensorFlow is as follows: 🔗
-
Assume there is a suitable pre-created Estimator, use it to build the first model and use its results to determine a baseline.
-
Use this pre-created Estimator to build and test the overall pipeline, including the integrity and reliability of the data.
-
If there are other suitable pre-created Estimators, run experiments to determine which pre-created Estimator works best.
-
The model can be further improved by building a custom Estimator.
54.8. Summary of Neural Network Building Methods#
Through the study of several experiments, we have currently mastered three methods for building neural networks:
-
Utilize various neural network components and functions provided by the
tf.nnmodule. -
Utilize various high-level neural network layers provided by the
tf.kerasmodule. -
Utilize high-level pre-created or custom encapsulated models provided by
tf.estimator.
In most cases, we can achieve our ideas using these three methods. However, here are some usage experiences for reference.
If the network to be implemented requires a high degree of
customization, has many of your own ideas and there is no
suitable high-level API layer for calling, then the first
choice is definitely
tf.nn.
tf.nn
is very powerful, but you need to define the training
iteration process by yourself, and most processes need to be
completed using a series of low-level APIs of TensorFlow.
The
tf.keras
module is mainly oriented towards implementing neural
networks containing normalization layers, such as the
classic convolutional neural network structures that will be
learned later. The API is easy to use, concise and clear.
tf.estimator
is itself built on top of
tf.keras, and Keras models can also be trained by creating
Estimators
🔗. Estimator simplifies the process of sharing
implementations among model developers. Models based on
Estimator can be run on a local host or in a distributed
multi-server environment without changing the model.
However, the use of Estimator may require sufficient
familiarity with TensorFlow to be used proficiently.
54.9. Summary#
In this experiment, we mainly learned about the use of Keras and Estimator in TensorFlow, and rewrote the model in combination with our previous examples. Keras is a very commonly used API and will be widely used in subsequent experiments. There are also inextricable connections between Estimator and Keras. As the complexity of the models we face increases, the advantages of high-level APIs will become more apparent.
Related Links